Showing posts with label book conservation. Show all posts

Friday, September 23, 2016

Introducing Emilie

Hello! My name is Emilie Duncan, and I am the new graduate book conservation intern in Eliza’s lab at UVa. I am a third year fellow in the Winterthur/University of Delaware Program in ArtConservation, and as such, will be completing a yearlong internship here. Designed as a practical, hands-on follow up to my first two years, the internship will involve treatment of both special collections and circulating library books and archival documents, participation in general preservation activities such as exhibit prep and pest management, and generally getting my feet wet with book conservation in the “real world.”

At the close of my third week here, I already have lined up some exciting and fascinating projects. Three weeks spent “lining up” projects? You might think I have not been using my time wisely, but there is a lot that goes into a conservation treatment before the actual treatment even begins.

                The first step is careful examination and consideration of the object at hand, including its materials, construction methods, and current condition problems. All of this information is necessary to plan out a treatment that will effectively and safely stabilize its condition and make it accessible to researchers. For example, in my first week, I was presented with a large box of maps and broadsides that had been stashed away by a former stacks manager because they were in need of some sort of treatment before being housed in the library stacks. One of the details that I recorded during my examination was media type and print process. Knowing what materials are present can help determine what treatment methods are possible. The oil- and pigment-based lithographic printing ink used on the bulk of the objects is not sensitive to water-based treatments, such as bathing. However, the poor-quality iron gall ink inscription at the bottom of one of the broadsides may include added ingredients that could wash away during aqueous treatment, so thorough testing will need to be carried out in order to ensure that the treatment does not alter the document in a negative way.

Another important factor to consider before proposing a treatment is the historical and material context of the object. This information can help to understand construction and condition aspects of the object as it exists today, as well as aid in determining specific goals of a treatment. A good example is another one of my upcoming projects, an early copy of Francis Bacon’s Sylva Sylvarum (an exhaustive natural history record published shortly after his death in 1626). I say “early copy” because the book is lacking the title page (and the front board, and most of its spine… but that is less relevant at this point) which contains the date of publication. It would be fairly easy to just look up the publication date of the book, but that is complicated by the fact that the book was republished in almost 20 editions in the 17th century alone, and without the title page it can be tricky to determine which edition I am looking at. However, in comparing the text with other copies of other editions in the special collections, and with images of other editions available online, I began to parse out the small differences that set the various books apart. During the hand press period, individual pieces of metal type were arranged by hand to print each sheet of text. Even if the same type was used and arranged the same way for different editions, small differences can be seen.See the picture below with the 1626 edition on the left and the 1631 on the right.
The red arrow points to the switched orientation of the type used in the border. Note the different catchwords in the yellow boxes.

Using this method, I was able to determine that the book was either a first edition (1626) or a reissue of the first edition (1627). (“Reissue” meaning the book was put on sale again without re-setting the type or making changes to the text – which could constitute a new “edition.”) The only difference between the 1626 version and the 1627 version is the addition of a fancy, engraved title page, in addition to the original, plain, letterpress title page (which still reads 1626). The reason for these variations, or any clues to which year the copy in the Small Special Collections was published, is still eluding me.  Further research and a possible trip up to the Folger to look at some other 1626/7 copies will hopefully shed some light on this soon. I’ll keep you posted!

All the condition and contextual information, along with a step-by-step proposal based on what I see when I look closely at each object, is recorded systematically in an assessment/treatment proposal document. This document serves both as a guide for the conservator during treatment and as a reference point for discussion with the curator, who will determine if the proposed treatment aligns with the research goals for the object.

Next, the object is photographed to record its condition and unique features before treatment. Usually, this is done on a copy stand for books and documents. However, many of the maps and broadsides I will be treating were too big, so they were done on the Digitization Production Group’s Cruse scanner. The images collected by the flatbed scanner are so high-quality that each scan takes about 10 minutes to complete!


After all this, the objects are finally ready to treat, and I hope to dive in on that step starting next week. 

Monday, August 12, 2013

Low Relative Humidity- In Pictures!


Conservators spend a lot of time talking about how environmental conditions can affect the overall stability of an artifact.  Our training includes reading many, many articles and case studies that document how fluctuations in temperature and relative humidity (RH) can cause dimensional change in an artifact and increase the rate of chemical decay.  High RH can cause a book to expand and is an even bigger factor when it comes to the chemical reactions that cause paper to degrade.

Low relative humidity is also a concern.  If high RH can cause a book to expand, low RH can case a book to shrink and warp.  Since a book is made of several different component parts that will respond to RH fluctuations at different rates, keeping books and artifacts at a stable RH is crucial.

These facts can be a little abstract and when sharing them with colleagues as I advocate for the care of the Library's collections, it can be difficult to convince people that a book that has survived hundreds of years without environmental control is still susceptible to low RH.  So I was particularly horrified and delighted on a recent cross-country plane flight when I noticed that the book I had brought with me, Maurice Craig's "Dublin 1660-1860" had started to respond to the low RH (10-12% at best) almost two hours into my flight.  Note how the covers have warped away from the body of the text block (pages).  The book had been completely flat when I packed it that morning.  I had been reading it during the flight and only noticed the warping when the flight attendant gave me a cup and I put the book down on the tray table.  I took the picture to make sure I wasn't mis-remembering the condition of the book and resolved to compare it with the condition of the book once I had returned home and the book had a chance to re-adjust to my air-conditioned home in Charlottesville.

My flight had been on Wednesday, August 7th, leaving SFO at 1pm Pacific Time.  The picture at right was taken Friday, August 9th about 8am Eastern Time.  Note how the covers are no longer warping away from the textblock.  Remarkable!

The low relative humidity on the plane is extreme, but it isn't uncommon.  The winter time RH for the Northeastern United States is often in the mid to low teens and collections that are housed in areas that don't have supplemental humidity control are at risk.  Most libraries address the need by keeping their fragile books in boxes.  I was going to return this book, but maybe I will renew it through the winter to see whether we need to make a box.


Monday, March 11, 2013

Cradles for Miniature Books

I gave a training session to a colleague last week, she needed to know how to display a group of miniature books safely and so I showed her a very simple, cost-effective method for making custom cradles out of 20 pt. board. 

My colleague has good hand skills although hands-on is not her primary role (she talks about this in her blog post), and I felt comfortable showing her the method and then leaving her to the task.  This can be a tough choice for a conservator who, in most cases, has the primary responsibility for the physical well-being of the collection.  Should I examine and document every item that goes on exhibit? should I make every custom cradle and install every item to ensure that nothing happens to our books? Perhaps, in an ideal world yes, but those who work in libraries know that life is far from ideal.  There are many projects and exhibits that happen on short notice and the more people who can "pitch in" the better.  Being the lone book conservator at a large special collections library means I have to make strict choices about how I spend my time so that the really needy books get the treatment they need.  Having trained my colleague means I can step back from the exhibits role just a little, and knowing that I do spend a lot of time with our library collections and will see or hear about any difficulties gives me confidence in this choice. 

Wednesday, January 23, 2013

Matching Colors

There are times in book conservation where you have enough of a book's original cover that you can incorporate the original pieces into the new conservation binding.  Usually, the boards are sturdy and it is the cloth of the spine that has fallen apart due to the stress of use and light damage.  The standard practice is to build a new spine out of airplane linen and adhere the remnants of the original spine over top.

In the picture below you can see the mostly re-bound book with the remnant spine to the left.  The book was originally a case binding with thin cloth over the spine and boards.  I chose a slightly different method of board attachment for the conservation binding so that the new binding would be more durable, and also so that I could address the needs of dealing with the original boards and spine separately.


The replacement spine is airplane linen that is painted with several layers of acrylic paint to match the original 19th century cloth.  The trick with matching this sort of cloth is that it is never faded to one color, since the spine of a book (as it sits on a shelf) is usually more subject to light damage than the boards.  If you look at my sample book on the left you see that the original color of the cloth was purple, but that the spine faded to  ocher.  The J.L. Mott book that I am treating has a similar color variation although the original spine is a now a darker brown.  So the linen that will show through in the joint area needs to be a faded purple-ish ocher, while the spine needs to be a darker brown.  Not only do I need to get the colors right, but I need to get the placement of the colors right as well.


 In this picture I've got my test colors up on the left, and the replacement spine cloth is on the binding to check the colors and placement.  I can fine tune the colors once the spine cloth is on the book, but it is much safer to do the majority of the paining when the linen is away from the original binding.  So I paint the replacement cloth, let it dry and hold it next to the original binding to check my progress.  When close to done, I place the painted cloth on the spine to see what is needed in the way of final touch ups.  As you can see, there is a portion of the original spine missing so I have to make sure that the color works across the width of the spine. 

This is the finished spine.  It turned out really well and only needed a little bit of re-touching when the original spine was adhered over the replacement linen spine. 

Tuesday, November 13, 2012

Finished Binding

I've published a lot of "process" posts, so it is about time that I catch up with some posts about finished treatments.  As I outlined in my "Not Too Matchy-Matchy" post, I have been working on Thomas Jefferson's original1825  list of books to be purchased for the UVa Library.  I recently finished the treatment, after washing, mending and sewing the pages.

I laced on the boards, pared and applied the leather spine as well as the marbled paper.  The final step was tooling a decorative line on the leather next to the marbled paper.
hot tool on the left, final binding in the middle, practice leather on the right
My model binding had blind lines tooled across the spine, but with such a thin book that wasn't a possibility, also I didn't want the 1825 manuscript to be a replica of my model so much as look like it would be the next notebook on the shelf in Jefferson's library. 

20th century "interim" binding on left, my conservation binding in the center, model binding on the right.
I'm really pleased with the way the binding turned out, not only is the laced-on structure stronger, but the materials are more in keeping with the time and place where the manuscript originated.

Wednesday, October 17, 2012

Not Too "Matchy-Matchy"

Conservation treatment is not about recreating the original artifact, and there is no way to really turn back the clock to make an old, well-used book look new.  As I have mentioned in my posts about treating Micrgraphia or Il Quattro Libri de'll Archittetura sometimes there is not enough of the original binding to do anything but make an educated guess as to what the original binding might have been.

One of the books I'm working on now is Thomas Jefferson's 1825 catalog of books for the UVa Library, his "shopping list" that was used to create the University's first library.  The book is actually two signatures from what must have been a larger blank journal.  At some point (probably in the early 20th century) the signatures were sewn into a new binding with blank pages at the beginning and the end to bulk out the text block and a new cover of leather and marbled paper.  It probably looked really spiffy back in the day, but the "new" binding did not have nearly the strength or archival soundness of the handmade paper from Jefferson's day.  By the time I saw the book, the added blank pages were falling out and the front cover was starting to detach from the binding.

several Poe signatures!
Binding a thin book can be very tricky, but I think I've come up with a structure that works, so then the question becomes how do I want the final binding to look?  Where does this catalog fit in to our Library collection?  Since I am confident that the original signatures were once part of a blank book and I know that Charlottesville had at least one stationer (seller of blank books and stationery) in business in the 1820's, Ebenezer Watts, I was at first thinking I'd do another reverse-calf binding like I'd done for the First Minute Book.  However, I looked through the Library's archival collection of record books from the early days of UVa and noticed that a number of the record books were simple reverse calf spines with marbled paper over the boards.  So I decided that I would model the binding on the first circulation book for the library. 

The library staff agreed with my concept, so then I had to track down period-appropriate marbled paper to cover the boards, which is not as easy as it sounds.  There are many different styles of marbled paper and the brightly colored, combed and fanned types are much more popular today. But the good news is that that there are almost as many marbling nerds out there as book nerds and I was able to find a paper that fit the time period.  The vendor offered to match any one of the marbled papers in our collection, but I didn't want it match so much as "fit in". 

Given these examples:


I received these two papers:
 I've placed them next to the leather I plan to use for the reverse goat spine.  I like the one on the left, what do you think?  Tune in next month for pictures of the finished product!


Monday, August 6, 2012

Miniature Books-Lindemann Collection

This was one of the first projects I worked on went I arrived at the Library in 2009 although I am just now getting around to posting about it, thanks to some recent interest on a list serv.

Miniature books are a very popular collectable in the world of books, and when you see a collection like our McGehee Lindemann Miniature Book Collection it is not hard to understand why, these books are absolutely charming.  However, they do present many challenges in terms of shelving, marking and handling.  

First of all, they're tiny.  Some more tiny than others, see in the picture below the little yellow and green book in the plastic box.  

The small and variable sizes mean that the books can easily shift and fall over on the shelf or one book can get lost behind the others.  Some of the books are made of delicate cloth or are quite old so it is important to have them in a box that can take the wear and tear of handling.  We use microfiche boxes that are big enough to accommodate most sizes and also have enough room for a little padding with archival tissue.  The trip back and forth to the reading room isn't that bumpy, but why take chances with so many unique books?


Inventory control is also important and so each book is tagged with its own mini barcode.  The 'fiche boxes have enough height to accommodate the rare book tags, although when an individual book is requested, the whole box is delivered to the reading room.

This last picture may not seem so exciting, but if you are a librarian, preservation officer or conservator and  know in that your 15,000+ collection of rare and unique miniature books is this well organized and this well cared-for, you can rest so much more easily at night.

Ahhh!

Friday, April 27, 2012

Palladio - AT


Last August I had a post "Next Up" that was a preview of my treatment of Andrea Palladio's book "I qvattro libri dell'architettvra". It was part of an exhibit loan to the UVa art museum, so as soon as the
front cover of the new limp vellum binding
 treatment was done, the book was out the door to join "Variety, Archeology and Ornament". Now that the book is back from loan, I have had the opportunity to do final "after treatment" (AT) photo doc, so you can see the results.  Photographic and written documentation is a crucial part of conservation treatment, not only for the sake of documenting the "before" and "after" condition of the book, but also for documenting my working process so that I, or another conservator, years from now will be able to follow what worked well, or what didn't work well.

I'm sharing the documentation pictures that I will archive with the rest of my treatment notes.  Perhaps they look a little stiff, with the labels and the color bar?

front opening, showing how the textblock laces into the cover
 But, documentation is a formal process, capturing and communicating details for future reference.  In creating this conservation binding I consulted articles and reference books on limp velum bindings as well as a model binding I made in graduate school. 

My documentation will also describe the materials I used to create the limp vellum binding, and the sources from which I purchased them.  Alum tawed pig skin was used for the sewing supports and goat parchment was used for the cover.  Not the sort of items you find in your average corner store!

 
new endsheet and original title page


That said, the treatment of this Palladio volume was incredibly fun.  The research that informed my decision making process allowed me to spend time with another copy of this book, and revisit a binding structure that I had enjoyed during my graduate student days.  Conservation treatment inspires exploration through close examination of a particular artifact, but then leads you to a broader examination of books and bindings from a similar time and place.


page opening toward the center

I'll post more details in the next couple of weeks, showing some of the "during" steps and some more pictures related to my background research.  For now, take a look at the picture on the right, notice the openability of the book, there are no weights holding the book open, just the weight of the pages, draping smoothly and the vellum flexing in response.  Also notice the finger smudges halfway up the margins from more than 500 years of people flipping through the pages.

Friday, December 9, 2011

Another Palladio

While I was very pleased with the results of my treatment of our Library's copy of Andrea Palladio's I quattro libri dell'architettura that doesn't mean that I'm done with Palladio.  I may never treat another copy of this work or another Palladio book, but I can certainly keep learning about 16th century printing and bindings and the best way to do that is to look at other copies.

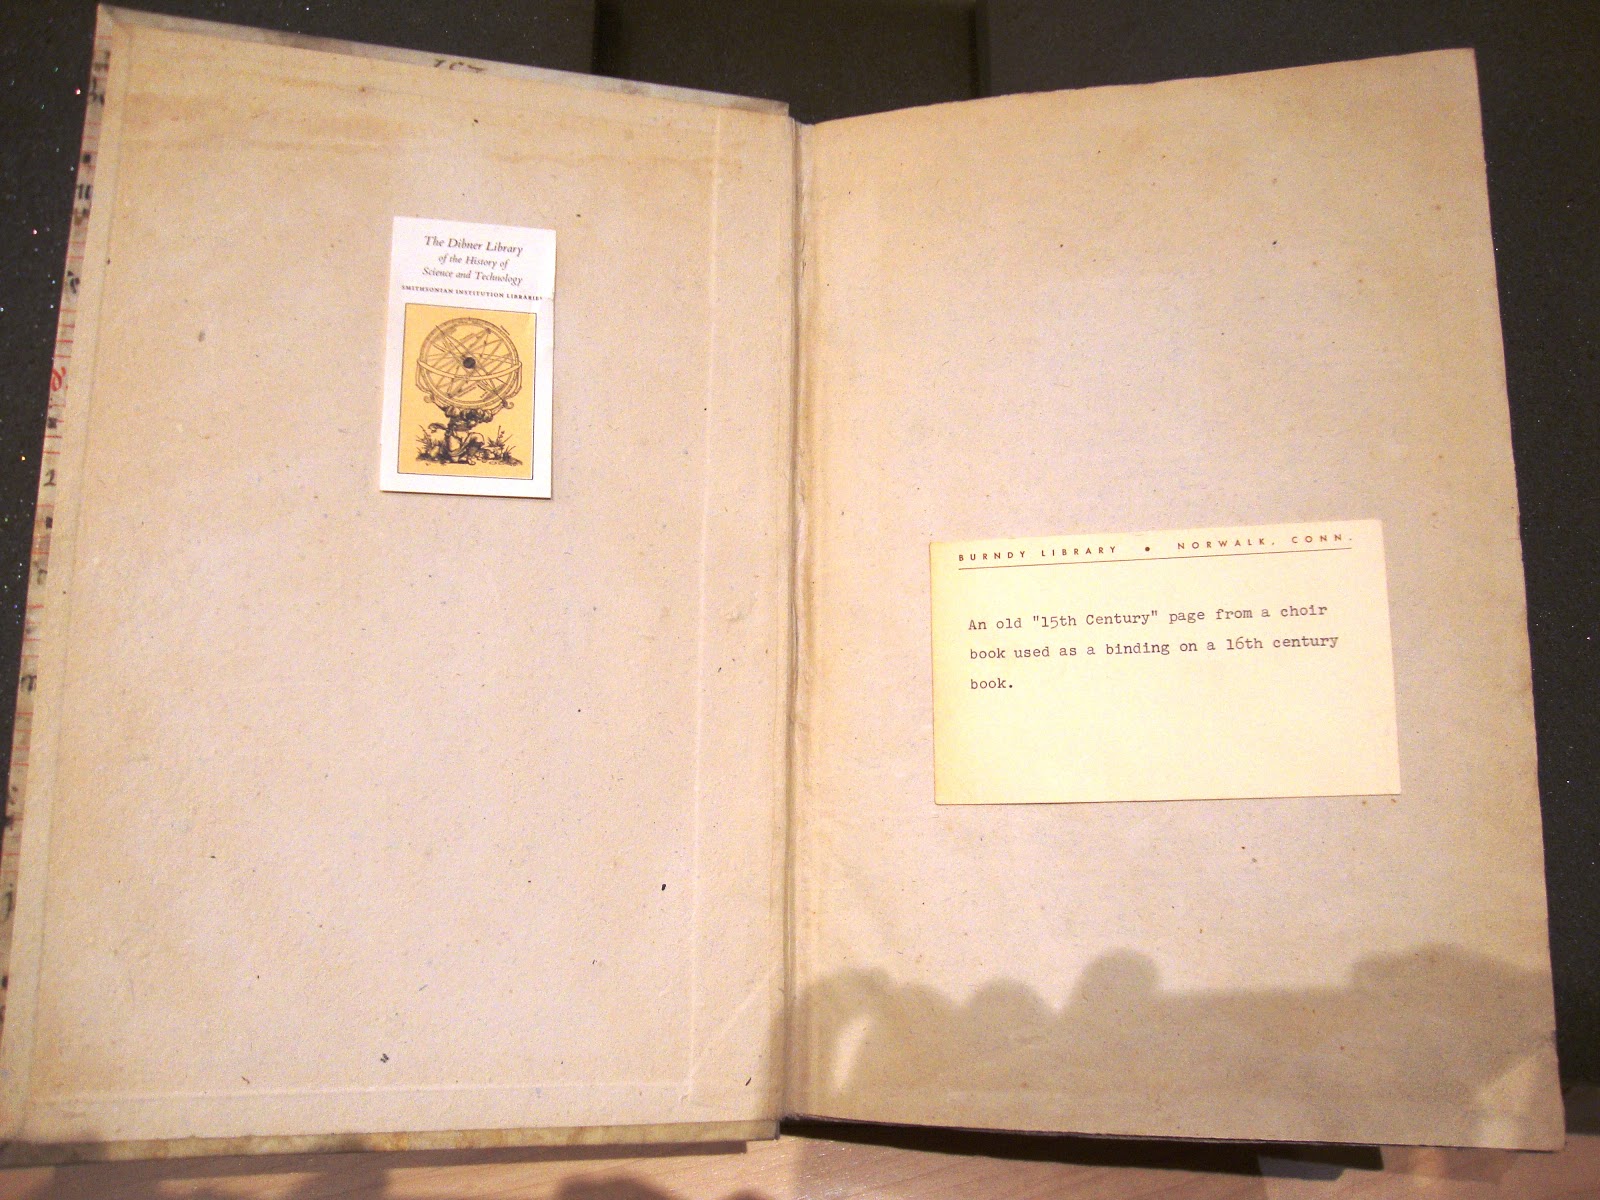
This is the Dibner Library's copy of I "quattro". Like the UVa copy the original binding has been lost to time and while the "re-binder" did do another vellum binding, they chose to use a 20th century case binding instead of something more contemporary with the text.


See the note from the Burndy Library, confirming my first impression.


I love this colophon and the marginalia on the facing page.


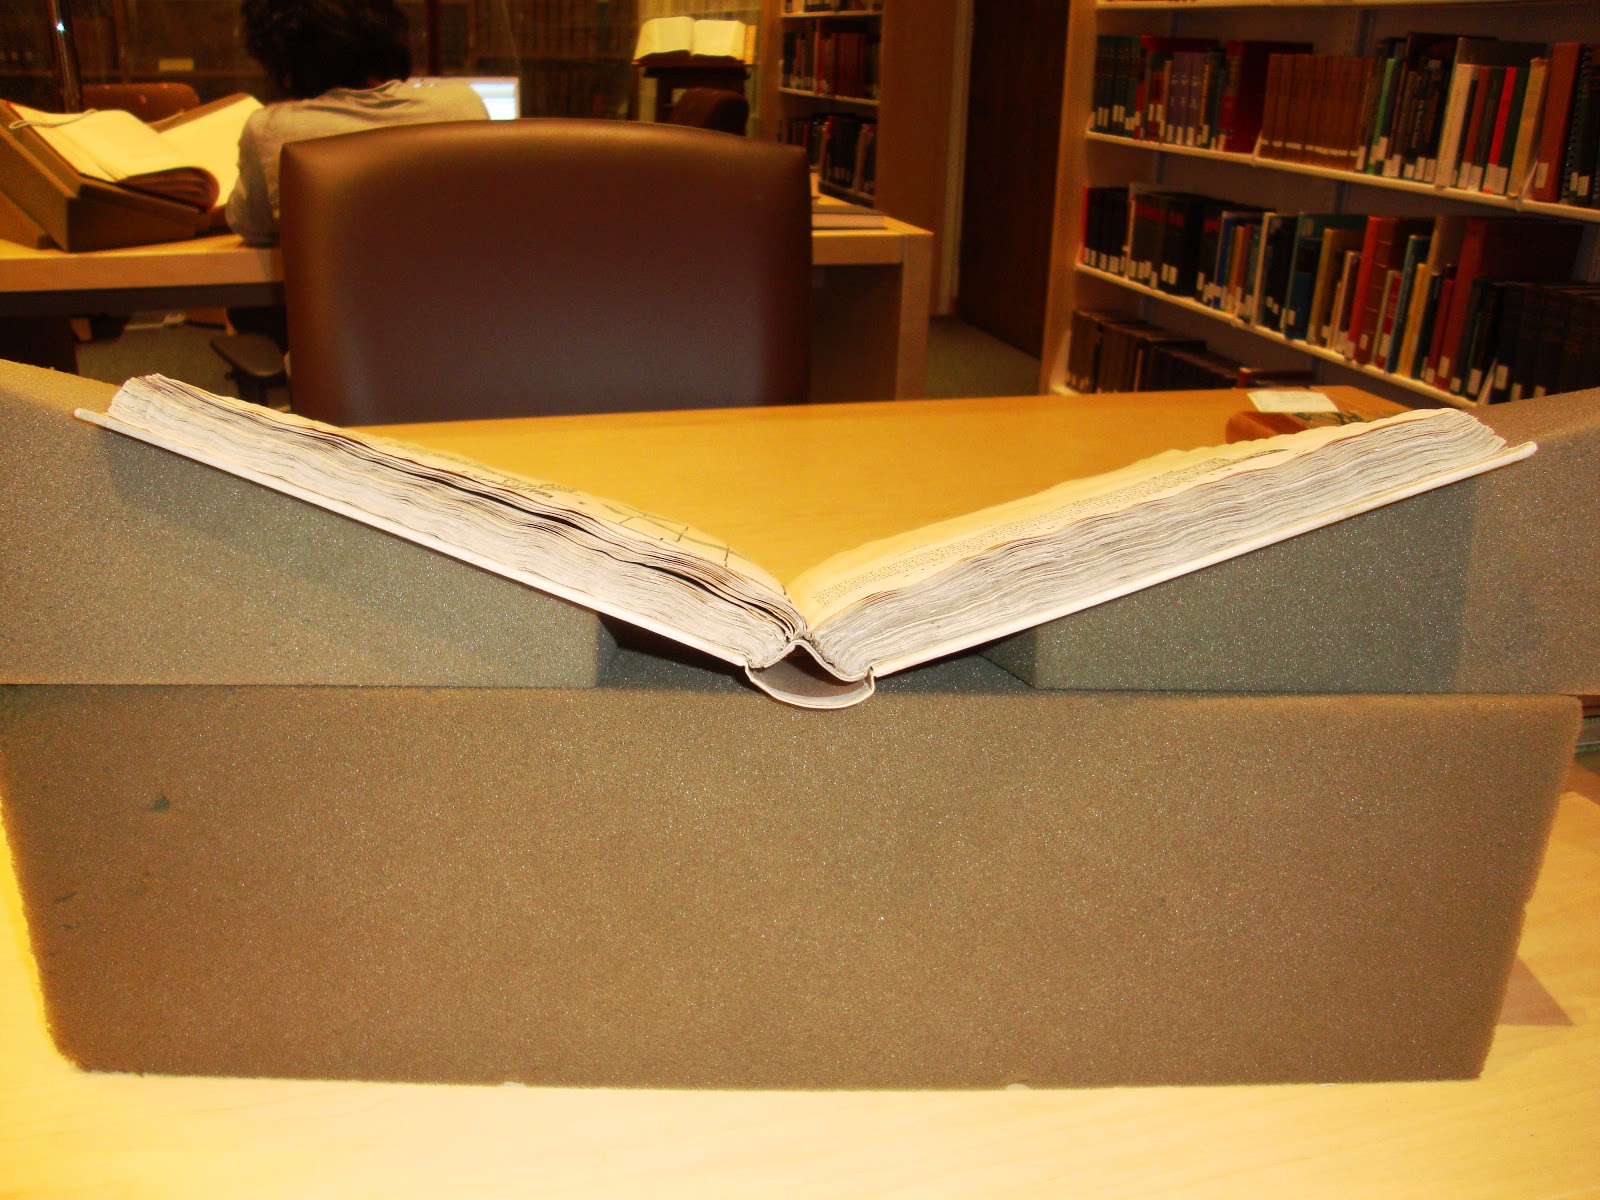
And what do I mean by case binding?  See in the  picture below how the spine of the book pops away from the spine of the cover.  Back in "the good old days" books were sewn on leather thongs or heavy cords which were laced into wooden boards or a piece of vellum. In the late 19th century book production became more of an industrial process and the process of sewing and making the cover became two separate steps.  The parts were joined by gluing the first and last pages (and maybe some linings) to the insides of the covers, much less sturdy, but much faster.  I'm not sure why the binder chose a case binding for this book, but the work is neatly done and since book has been in a rare book library since the early 20th century, careful handling has kept the binding intact.

I'll post some pictures of my Palladio when it comes back from exhibit.  Stay tuned!

Wednesday, December 7, 2011

Making Headlines

My lab, and that of my colleague Steven Villereal, the Library's Audio-Visual Conservator, were featured on the University's "UVa Today" website.  We're delighted with the opportunity to share what we do behind the scenes with the broader University community.  I was particularly pleased with the way the writer drew a parallel between what Steven and I do despite the differences in the materials we work with.  Conservation is just as much about research, decision making and ethics as it is about torn paper or warped film. 

The media department also did a separate video of me talking about my research into the Library's copy of Micrographia, although I  wish there was more footage of the book instead of my "talking head".

Enjoy!

Monday, August 1, 2011

Next Up

My next treatment is Palladio's "I quattro libri dell'architettura di Andrea Palladio" which was published in Venice in 1581.  Quite a bit has happened to this book since it first came off the press.  It has had at least four owners judging by the bookplates and inscription on the front paste down and fly leaf.  It has been re-bound at least twice judging from the number of different endpapers attached to the text block; and it has been heavily used for reference given the "thumb stains" on the fore edge margins. There are scribbles of sums on a few of the pages and a few doodles as well.
the four books, dis-bound with their boards
There were several attempts to re-attach the boards with various kinds of tape (all failed).  That said, it is a pretty straight forward treatment.  The binding was in horrible shape, the sewing was broken in several places, the front board was completely detached and many of the pages were broken at the gutter margin.   
So, nothing to do but finish taking the book apart so that it can be cleaned, mended and re-bound.  Once the treatment plan was approved by the Head of Special Collections, I went ahead with the dis-binding, carefully noting where the page numbers had been mis-printed and whether any signature marks or catch words had also been mis-printed. 

Next, dry cleaning to pick up as much loose dirt as possible, and then into the water!  I washed each book separately since there were too many pages to do in one session.  Most of the books needed multiple baths
first bath on the left, second bath on the right


before the paper stopped releasing dirt into the water.  The first bath for this book was at pH 5.5 after a half hour soak which is somewhat acidic, but after three baths the water stayed clear, and then the pages went into a final alkaline bath to impart a little bit of an alkaline reserve in the paper.  It still amazes me how the water changes color so dramatically, and the paper actually looks cleaner and brighter once it dries. 

This book needs to be on exhibit at the end of the month, so stay tuned for more conservation treatment action!!

Monday, June 20, 2011

Arcadia and the shadow of a louse

I saw the play Arcadia the other week.  The setting is the manor house Sidley Park, in two different time periods, 1809-1812 and the present day.  The action of the present day involves two academics and their research to prove theories about what happened at the house in the past.  Hannah Jarvis is researching a person she has named "the Sidley Park Hermit", her belief in his existence is largely based on a drawing of him in the landscape picture book of the manor house grounds.  However, the audience has seen Thomasina Coverly (in 1809) draw the hermit in the book as a joke on the landscape architect Mr. Noakes.

Bernard Nightingale is trying to prove that Lord Byron left England in 1809 because he shot a Mr. Crater (a guest at Sidley Park) in a duel.  Nightingale can place Lord Byron at Sidley Park thanks to a notation in the game book, but he can't prove the Crater connection.  Again the audience has seen "what really happened" in a previous scene and knows the duel was between Crater and Septimus Hodge, Thomasina's tutor and that Crater survived.

Jarvis refuses to publicize her theories until she has proof, while Nightingale goes ahead and lectures on his theory with only the evidence from the game book to back him up. The action of the play eventually reveals that Nightingale's theory is incorrect while Jarvis finds proof of her hermit.

As a conservator, I see a lot of tantalizing clues when I take a book apart.  Watermarks are easier to compare and document when the book is apart and each page can be placed over a light sheet.  Plates can be examined more closely when laid flat on a bench.  I can see many traces of where the binder, printer and perhaps author made choices about a book's production.

For example, the plate of the cheese mites; when I examined it closely, I noticed that the end of the caption over each print had been scraped away, with a teeny bit of printer's ink remaining.  I can't make out what had been printed there, but it is clear that something has been scraped away.  I'm kicking myself now because when I examined the Folger Library's copy of the 1667 edition, I didn't take a picture of the cheese mites plate and now I can't compare the captions.  Could the UVa 1667 copy be a printers proof? based on the cheese mites plate, and the fact the UVa flea plate has some of the reference letters engraved backwards, I'm starting to wonder, and again, I don't have a photo of the flea plate from the Folger copy for reference. 

Which brings me to the shadow of a louse.  Or rather the fact that the UVa plate has a louse that does not cast a shadow and is the only example that I can find of this particular version of the plate.  I examined the Folger 1667 Micrographia and the Chemical Heritage Foundation's 1665 Micrographia and in both books their louse casts a shadow (see the Folger's louse below).  I also sent inquiries to the Smithsonian's Dibner Library regarding their 1665 copy and received word from the Library Company that their copies of the 1745 "Restaurata" edition all had plates with a louse that cast a shadow.

There are other differences in the louse plates and I am extremely grateful to the staff at the various libraries who have helped me pin down the details. 


 While all of this comparison and tracking down of watermarks ultimately did not change the course of conservation treatment for the UVa Micrographia, it has helped me sort though many of the details I noticed during dis-binding.  My notes will be included in my treatment report and available to future researchers who may be able to put those details together with fresh discoveries that finally reveal the true circumstances behind the differences in the two versions of the louse.  For now there is only enough information to ask more questions rather than draw any conclusions, but that is OK because I still have one fascinating book to bind!

Wednesday, May 18, 2011

watermark HIBERNIA

I've never seen this watermark before.  It is on the end sheets of our 1667 edition of Micrographia.  I've got a nifty fiber optic sheet that will back light paper and allow me to take a photo for sharing.

I've got a couple of leads on this paper, but more would be appreciated! 

I don't quite know whether knowing the source of endsheet paper will affect the decision making process for treatment, but we have no provenance information related to this book so any information is progress.  My first lead, from a colleague at the Dibner Library, told me that the watermark is from Moses Verney who had a mill in Whitechurch Ireland in the later half of the 18th century, which tells me that the remnants of the binding/sewing that I did remove were probably not the original binding of the book. 

It's a start!

Tuesday, March 22, 2011

Before & After

 Conservation of an artifact requires careful documentation
 before and after treatment.  Written documentation includes a description of the book and its condition but also the steps and materials involved in the treatment.  Photographic documentation supplements the written, showing particular damage as well as other details you may not have noticed during an initial review. 

This book had a broken hinge, which means the front cover had become detached from the text block.  Portions of the leather spine were also missing. 

There are many ways to re-attach a board depending on the structure of the given book, the covering material and the condition of the pieces you have to work with.  In this instance, board tacketing was the best option.  Tacketing uses linen thread laced through the shoulder of the book and then into the board to re-attach the board.  It does not replicate the original method of board attachment, but it is a very strong and subtle method that does not require you to take the book apart or alter the sewing structure in any way.

The other choice I had to make in this treatment was concerning the spine.  Should I replace the original with a  new piece of leather? Combine the old with new? or stabilize the original?  

Stay tuned for the "after treatment" photo!


OK, here's the after treatment photo of the front hinge, demonstrating that the front board has been re-attached.  I lined the hinge with a light-weight piece of Japanese tissue and then colored the tissue with colored pencil to blend it into the absolutely gorgeous marbled paper.


And now for the spine! I decided to go with the last option, stabilization of the original which involved placing a small hinge of Japanese tissue under the front edge of the spine, which allows the spine to flex as the book opens and closes. 

The spine is quite narrow so any new leather would have to be very thin and it would have been a tricky thing to attach the original over a new piece.  And since I'm not including a photo of the cover in this blog post, you'll have to take my word for it that there's a paper inlay on the cover that would suffer if I tried to lift it to accommodate the thickness of new leather.  This is a really beautiful binding, and I did my best to make it structurally sound with minimal impact on the appearance.

A few more words on documentation.  Written documentation of conservation treatment is the ethical obligation of all conservation professionals.  Photographic documentation is recommended and certainly enhances the written record.  Documentation must be archived so that it is available as part of the permanent record of the artifact.  This provides an accurate account for future researchers and also gives guidance should the artifact need to undergo further conservation treatment.

My current lab is too small to accommodate a photo documentation area, so I rely on the Digital Services unit located in our special collections library.  Digital Services performs the on-demand scanning for the University research community so they are quite a big operation with very high tech equipment, plus a staff who is current on image capture and archiving protocols.  I am doing my best to fit into their work flow so that I can take advantage of their equipment and expertise. 

Tuesday, October 12, 2010

Collating


Before you take a book apart to clean and mend the pages, re-do the sewing and provide a new binding, you've got to collate it.  Modern books have page numbers to keep everything in order, but back in the good old days, conventions were different; the preface, dedication, introduction might be numbered with lower case Roman numerals or not at all.
the signature is noted with an "A", the catchword corresponds to the first word on the next page


 "And" bottom left corresponds to "And" on the top right
The main text might have page numbers, but more often there would be letters to mark the signatures, and catchwords to help the printer and binder keep everything in order as the book was being printed and assembled.
Plates also add another layer of complexity, sometimes they are numbered sequentially, and sometimes the printer comes up with another system.  In this instance the plate is numbered according to the page it is supposed to be facing, which is a great idea, I just have to make a note as to which page the plate is actually bound with.


Books are made up of many, many moving parts that need to fit together and while page numbers and signature marks may seem like enough to re-assemble all the pieces, it is better to be safe than staring at a pile of sheets and loose plates going hmmm....
do you see the quill from someone cutting a new point?

So, collating, in the conservation context, is a precise documentation of how each page fits into the overall sequence and structure of a book. It can seem a little painstaking to some, but I enjoy it.  It is a great way to commune with a book that I am about to work on, learn something new, and notice all sorts of little details and surprises.

Tuesday, August 3, 2010

Iron Gall Ink

This is a great example of what iron gall ink can do to paper.  Can you see through the loss in the signature to the following page? 

It is also a great example of the difference in the stability of the two inks, the iron gall ink which was the predominant writing ink for many, many centuries.  And carbon black printing ink which was used in the days of movable type.

Iron gall ink is an acidic ink which worked really well when scribes were writing on parchment.  Parchment is a relatively thick and tough writing surface and the acid would sink into the parchment and make a very permanent, dark mark  Depending on how the ink was made (recipes abound) the ink could be more or less acidic.  This didn't matter so much as long as the writing or drawing was on parchment, but then the world switched to paper as the predominant writing surface and the ink proved too aggressive.


Iron gall ink is of significant importance to the conservation community because of its prevalence in archival documents, manuscripts and works of art. The ink corrosion website is one site that documents history and research related to this topic. 

Many different recipes were used over the years, and the stability of the ink varies according to the writing surface, storage conditions and handling.  Most book and paper conservators will have to make treatment decisions based on the condition of the iron gall ink they're dealing with.  In some instances, the ink is stable, and sometimes it has eaten through the paper.  There's the permanence of the written word and then there's permanence of the ink.

Friday, July 2, 2010

not all stickers stick the same

Things change, especially in libraries. Books that were acquired in 1963 for the general collections have matured into rare books. The gorgeous publisher's cloth bindings, the scarcity of these titles in their original cover and their significance as milestones in their subject area are all factors in the transition to special collections.

Which means it is time to get the barcode stickers off the front cover. It can be done, but not all stickers stick the same. You've got to be ready for things to go smoothly like the two dark green books that had the same type of sticker, (the plastic carrier lifted nicely as did the residual adhesive when I applied a vinyl eraser) or not so smoothly as with the other book that had a different type of sticker (the paper carrier lifted quite readily, but the residual adhesive did not agree with the vinyl eraser). You've got to be ready to adapt your original plan, have another type of eraser on hand, or maybe a scalpel with a curved blade, not the straight blade. And if that doesn't work then be ready to try the hot air pencil, (maybe rolling the adhesive off with a metal spatula or maybe with an eraser) all the while paying close attention to the cloth of the book to make sure you are just lifting the sticker and residual adhesive and not scuffing the cloth or decoration and making a bigger mess.

And try not to cut yourself with the scalpel.

Monday, June 28, 2010

I can fix this


Required reading for my Rare Book School class The American Book in the Industrial Era 1820-1940

It is in kind of rough shape, detached boards, spine torn at the joints, housed in a phase box...


but I can fix this...


with new end sheets, spine linings and a new cloth spine under the original.


how often do books come back to the circulation desk looking better than when they were checked out? ; )


Saturday, May 8, 2010

the safe arrives


the safe arrives!!!
my last essential piece of equipment, to provide security and fire protection for the collection materials that I am going to be working on.

It's big, it's heavy, and it's got to get from the loading dock to the lab...


since there were only single-width doorways, the safe had to be moved by people, no room for forklifts,


and I did a lot of research and measuring to make sure that I could get the maximum amount of storage, but the safe would still fit through the door


I think there was a total of seven guys working on this, can you find them all in the picture?


hooray!!!!