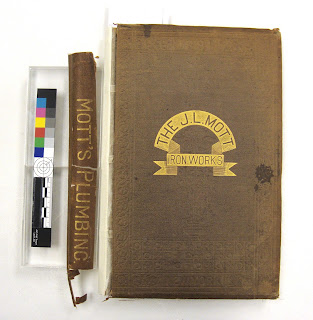
In the picture below you can see the mostly re-bound book with the remnant spine to the left. The book was originally a case binding with thin cloth over the spine and boards. I chose a slightly different method of board attachment for the conservation binding so that the new binding would be more durable, and also so that I could address the needs of dealing with the original boards and spine separately.
The replacement spine is airplane linen that is painted with several layers of acrylic paint to match the original 19th century cloth. The trick with matching this sort of cloth is that it is never faded to one color, since the spine of a book (as it sits on a shelf) is usually more subject to light damage than the boards. If you look at my sample book on the left you see that the original color of the cloth was purple, but that the spine faded to ocher. The J.L. Mott book that I am treating has a similar color variation although the original spine is a now a darker brown. So the linen that will show through in the joint area needs to be a faded purple-ish ocher, while the spine needs to be a darker brown. Not only do I need to get the colors right, but I need to get the placement of the colors right as well.
In this picture I've got my test colors up on the left, and the replacement spine cloth is on the binding to check the colors and placement. I can fine tune the colors once the spine cloth is on the book, but it is much safer to do the majority of the paining when the linen is away from the original binding. So I paint the replacement cloth, let it dry and hold it next to the original binding to check my progress. When close to done, I place the painted cloth on the spine to see what is needed in the way of final touch ups. As you can see, there is a portion of the original spine missing so I have to make sure that the color works across the width of the spine.
This is the finished spine. It turned out really well and only needed a little bit of re-touching when the original spine was adhered over the replacement linen spine.


1 comment:
..sometimes, the universe just works :)
[I saw your blog post just when I needed a refresher on cloth colour-matching]
Thanks x
Post a Comment